La plupart des parents questionnés ont indiqué acheter la photo pour différentes raisons. La principale? «Ça fait un souvenir». Les plus? «C’est une photo professionnelle», indique Cindy Patterson. «C’est un souvenir imprimé», ajoute Julie Gagné. «On aime aussi voir l’évolution à chaque année», mentionne Audrey Tremblay. Plusieurs mères de Québec ont confié en donner des exemplaires à la famille proche.
Noémie Stuelsatz-Girard considère quant à elle qu’elle peut prendre de bien meilleures photos que celles scolaires sur un fond un peu quétaine. «Ça ne ressemble pas à nos enfants. L'an passé, le photographe a même replacé les cheveux de ma fille», fait valoir Mélissa Morin qui ne les achète pas.
Des prix exorbitants
La photo scolaire comprend toujours plusieurs portraits de l’enfant mais également une photo de groupe toujours gratuite. Les prix varient généralement de 15$ pour un tirage à parfois plus de 60$ pour l’ensemble des photos. Achat numérique seulement, photo imprimée sur tee-shirt, tasses ou aimants, le choix est vaste. Laurie Bélanger se contente d’ailleurs de garder les épreuves en raison du montant, souvent jugé excessif.
Fonctionnement indépendant à chaque école
Il faut savoir que la photo scolaire est discutée de façon interne au sein du conseil de chaque établissement qui choisit un photographe. L’école du Freinet, située à Beauport, a d’ailleurs un comité spécial à la photo de classe formé de quatre ou cinq parents qui se rencontrent trois fois par année pour recevoir les offres des photographes, faire un choix, attribuer le contrat et organiser la journée photo, peut-on lire sur leur site internet.
À l’école Jeunes-du-Monde de Limoilou, une enseignante souhaitant rester anonyme indique que la question d’arrêter la tradition s’est posée sérieusement l’année dernière. «Plusieurs compagnies [de photographie] boycottent même notre école car elles ne font pas assez de ventes, ce n’est pas assez rentable par rapport à la photo de groupe gratuite», déplore-t-elle. Finalement, l’enseignante a indiqué que l’école a décidé de garder la tradition. D’abord, pour la photo de groupe qui renforce le sentiment d’appartenance, ensuite pour avoir une photo d’identité des élèves dans le système informatique.
Plusieurs autres enseignants indiquent que la photo de groupe est essentielle comme souvenir collectif.
La Fédération des comités de parents du Québec n’a pas de position précise sur le sujet. «Pour nous, ce qui est important c’est que ce soit décidé au sein de chaque établissement et que les parents aient le choix de la prendre ou non», souligne Stéphanie Rochon, conseillère en communication pour la Fédération des comités de parents du Québec.
Invitées à commenter le dossier, les entreprises de photographie scolaires Le Danube et Photo de la Capitale n’ont pas retourné nos appels.
L’immortalisation de l’enfant en milieu scolaire existe en Occident depuis l’avènement de la photographie, selon Wikipédia.
Le ministre des Transports et ministre responsable de la région de l’Estrie, M. François Bonnardel, est heureux d’annoncer la fin de ce projet qui a permis d’élargir l’autoroute sur une distance d’environ 5,3 kilomètres et de reconstruire le pont d’-étagement au-dessus du boulevard Louis-XIV. Ces nouveaux aménagements très attendus amélioreront la sécurité et la fluidité de la circulation pour le secteur de la rive nord de Québec.
Le ministre souligne, par la même occasion, l’achèvement du projet majeur de reconstruction de l’échangeur des autoroutes Félix-Leclerc (40) et Laurentienne (73/973), réalisé de 2014 à 2018. Ce projet, qui s’est terminé une année plus tôt que prévu, a permis la reconstruction des deux structures de l’autoroute 40 situées au-dessus de l’autoroute 73, la reconstruction de la chaussée de ces deux autoroutes, la réfection de toutes les bretelles de l’échangeur ainsi que la modernisation de la signalisation et du drainage.
Faits saillants :
-Le projet d’élargissement de l’autoroute Laurentienne représente un investissement de 16,5 millions de dollars. Entre 66 000 et 88 000 véhicules circulent en moyenne sur ce tronçon de l’autoroute Laurentienne, ce qui en fait l’un des plus achalandés de la Capitale-Nationale.
-Des travaux de parachèvement pour l’élargissement de l’autoroute 73 sud seront réalisés au printemps 2019.
Québec, le 30 novembre 2018 – La Ville de Québec et le gouvernement du Québec annoncent les projets retenus dans le cadre du soutien à la production cinématographique et télévisuelle. Rappelons que ce soutien financier, habituellement de 250 000 $, a été bonifié à 650 000 $ pour l’année 2018 grâce à des ajouts ponctuels de 250 000 $ par le ministère de la Culture et des Communications (dans le cadre de l’Entente de développement culturel), ainsi que de 150 000 $ par le Secrétariat à la
Capitale-Nationale.
Parmi les onze projets qui ont été soumis, six ont été retenus par le comité de sélection :
Mö Films inc. pour le documentaireCe que le monde porte en soi (75 000 $)
Productions 10e Ave pour le long métrage de fiction-animation Félix et le trésor de Morgäa (325 000 $)
Lamarche à Vélo productions inc. pour le documentaire en deux épisodes Anxiété : le poison d’une société stressée (70 000 $)
Les productions Trait d’union pour le documentaire Le chaînon manquant de notre histoire (65 500 $)
Agence ComediHa! inc. pour Synvain Rénove : Tel que vu à TV (55 000 $)
Gregg Productions inc. pour Arthur L’aventurier au bout du monde en Australie (59 500 $)
Des projets porteurs de retombées Les projets déposés démontrent la vitalité du domaine de la production cinématographique et télévisuelle dans la région, tant par la qualité des projets soumis que par la diversité des types de production et des sujets abordés.
Ces six projets représentent des coûts de production de plus de 10 M$. Selon les critères d’admissibilité des projets, un minimum de 60 % des dépenses doivent être effectuées dans la région de Québec. Des retombées en termes de visibilité et de rayonnement pour la ville sont également à prévoir lorsque les projets seront portés au petit ou au grand écran.
À propos du Soutien à la production cinématographique et télévisuelle Rappelons que le soutien à la production cinématographique et télévisuelle, mis sur pied en septembre 2015 par la Ville de Québec, vise à appuyer l’industrie locale. Il remplit également les objectifs suivants :
soutenir des productions de longs métrages (minimum 75 minutes) ou télévisuelles ayant des retombées significatives sur l’industrie cinématographique et télévisuelle de Québec;
favoriser la concrétisation d’idées originales issues de sociétés de la région de la Capitale-Nationale, et voir à ce que l’ensemble de la chaîne de développement, de production et de postproduction soit assurée par des entreprises, des techniciens et des créateurs locaux;
s’inscrire en complémentarité de l’offre de financement existante.
Il est destiné exclusivement aux entreprises basées et en activité depuis plus de 12 mois sur le territoire de la région de la Capitale-Nationale. Pour obtenir plus de renseignements, les personnes intéressées peuvent consulter la section « Incitatifs financiers » du site Internet de la Ville de Québec au ville.quebec.qc.ca/tournage.
Québec, ville de tournage Le Bureau des grands événements de la Ville de Québec agit à titre de bureau de film autant pour l’accueil de productions dans la région de la Capitale-Nationale que pour l’industrie locale. Il est le guichet unique auprès des services municipaux requis par les tournages et facilite l’accès aux lieux et aux ressources locales. Il gère des ententes avec des partenaires privés et publics, il administre des programmes de financement et il coordonne des actions dans le but de stimuler l’industrie cinématographique et télévisuelle de Québec.
It's likely you already have an understanding of what Human Resources does -- at the very least, you probably know they have tasks that include recruiting and hiring employees, and dealing with an organization's culture.
However, it's a tricky term to define, particularly since HR deals with so many different aspects of a company.
Along with recruiting and hiring employees, Human Resources is responsible for compensation and benefits, on-boarding employees, training, organization development, and workplace culture -- this long list of tasks can make it difficult to cleanly define HR in the first place.
Here, we've defined HR in less than 300 words. Whether you're interested in pursuing a career in the Human Resources field, or simply need to know how your HR department can help your team, it's critical you understand the term. Fortunately, we've made it easy.
What is Human Resources?
Human Resources is in charge of dealing with all issues related to the people within your organization. This includes recruiting and hiring people, as well as onboarding employees, but it also involves tasks required to retain employees, long-term. For instance, HR might develop wellness initiatives, provide guidance regarding disciplinary actions, or promote career development or training programs to strengthen employee satisfaction. Additionally, HR handles compensation and benefits.
When I first started my marketing career and needed to include an image in one of my articles or post a picture on social media, the image’s format didn’t matter to me. In my eyes, JPG and PNG were exactly the same.
Once I actually dug into the difference between the two, though, I realized they’re quite different. But one format isn’t necessarily better than the other -- JPG is optimal for some situations while PNG is optimal for others.
In a nutshell, JPG images are best suited for social media and blog posts because they’re optimized for photography and have a smaller file size than PNG images.
PNG images are best suited for web graphics and professional photography because they maintain their quality no matter how many times you open and save them, whereas JPG images decline in quality every time you open and save them.
Fortunately, JPG and PNG images aren’t permanently stuck in their respective file format. You can convert images from PNG to JPG and vice versa in less than one minute with the help of some free online tools.
How to Batch Convert Files from PNG to JPG
1. Visit one of the free online PNG to JPG converters listed in the section below.
2. Upload your PNG images.
3. Press “Convert” to convert your PNG images to JPG images.
4. Click “Download” to download your new JPG images.
With iLoveImg, you can convert up to 15 PNG files at a time without signing up for a free account. If you register for a free account, you can convert up to 30 PNG files at a time.
Online-convert.com offers a free tool that lets you convert up to 20 PNG files at a time without giving them your email address. If you buy their premium version, you can convert up to 200 PNG files at a time.
How to Batch Convert Files from JPG to PNG
1. Visit one of the free online JPG to PNG converters listed in the section below.
2. Upload your JPG images.
3. Press “Convert” to convert your JPG images to PNG images.
4. Click “Download” to download your new PNG images.
With iLoveImg, you can convert up to 15 JPG files at a time without signing up for a free account. If you register for a free account, you can convert up to 30 JPG files at a time.
Online-convert.com offers a free tool that lets you convert up to 20 JPG files at a time without giving them your email address. If you buy their premium version, you can convert up to 200 JPG files at a time.
Comment obtenir vos 100 premiers avis Facebook : https://bit.ly/2SojZbr Les avis Facebook sont réputés fiables grâce à leur précision dans le temps. Bien entendu, tous les avis ne reflètent pas une expérience utilisateur mais peuvent refléter votre personnalité en tant que propriétaire. Découvrez comment augmenter vos avis sur votre page dans ce tuto e-commerce et webmarketing. Vous avez besoin d'un site e-commerce ou d'effectuer la refonte de votre boutique ? Contactez-nous, on vous accompagne dans votre projet web ! Aimez, partagez, commentez, posez vos questions... Et surtout, abonnez-vous à la chaîne pour découvrir nos vidéos formation et nos tutos en temps réel ici : https://www.youtube.com/subscription_... Retrouvez-nous également sur : - Facebook https://www.facebook.com/marketacademy - Twitter https://twitter.com/marketacademyfr - Google + : https://plus.google.com/+Market-academy Merci à tous :) #MarketAcademy , http://www.market-academy.com/ Tuto e-commerce - Comment obtenir vos 100 premiers avis Facebook - Market Academy par Sophie Rocco : https://youtu.be/rLe_C0F6Weo [Read More ...]
I like to think of Microsoft PowerPoint as a test of basic marketing skills. To create a passing presentation, I need to demonstrate design skills, technical literacy, and a sense of personal style.
If the presentation has a problem (like an unintended font, a broken link, or unreadable text), then I’ve probably failed the test. Even if my spoken presentation is well rehearsed, a bad visual experience can ruin it for the audience.
Expertise means nothing without a good presentation to back it up. For starters, grab your collection of free PowerPoint templates below, and use the tips that follow to perfect your next presentation.
No matter your topic,successful PowerPointsdepend on three main factors: your command of PowerPoint's design tools, your attention to presentation processes, and your devotion to consistent style. Here are some simple tips to help you start mastering each of those factors, and don't forget to check out the additional resources at the bottom of this post.
PowerPoint Presentation Tips
Don't let PowerPoint decide how you use PowerPoint.
Create custom slide sizes.
Edit your slide template design.
Make sure all of your objects are properly aligned.
Use "Format Menus" to better control your objects' designs.
Take advantage of PowerPoint's shapes.
Create custom shapes.
Crop images into custom shapes.
Present websites within PowerPoint.
Embed your font files.
Save your slides as JPEGs.
Embed multimedia.
Bring your own hardware.
Use "Presenter View."
PowerPoint Style
1. Don’t let PowerPoint decide how you use PowerPoint.
Microsoft wanted to provide PowerPoint users with a lot of tools. But this does not mean you should use them all. Here are some key things to look out for:
Make sure that preset PPT themes complement your needs before you adopt them.
Try to get away from using Microsoft Office’s default fonts, Calibri and Cambria. Using these two typefaces can make the presentation seem underwhelming.
Professionals should never use PPT’s action sounds. (Please consider your audience above personal preference).
PowerPoint makes bulleting automatic, but ask yourself: Are bullets actually appropriate for what you need to do? Sometimes they are, but not always.
Recent PPT defaults include a small shadow on all shapes. Remove this shadow if it's not actually needed. Also, don’t leave shapes in their default blue.
2. Create custom slide sizes.
While you usually can get away with the default slide size for most presentations, you may need to adjust it for larger presentations on weirdly sized displays. If you need to do that, here's how.
In the top-left corner, choose "File."
Select "Page Setup."
Type the height and width of the background you'd like, and click "OK."
A dialogue box will appear. Click "OK" again.
Your background is resized!
Tip: Resize your slides before you add any objects to them or the dimensions of your objects will become skewed.
3. Edit your slide template design.
Often, it's much easier to edit your PowerPoint template before you start -- this way, you don't have design each slide by hand. Here's how you do that.
Select "Themes" in the top navigation.
In the far right, click "Edit Master," then "Slide Master."
Make any changes you like, then click "Close Master." All current and future slides in that presentation will use that template.
4. Make sure all of your objects are properly aligned.
Having properly aligned objects on your slide is the key to making it look polished and professional. You can manually try to line up your images ... but we all know how that typically works out. You're trying to make sure all of your objects hang out in the middle of your slide, but when you drag them there, it still doesn't look quite right. Get rid of your guessing game and let PowerPoint work its magic with this trick.
How to align multiple objects:
Select all objects by holding down "Shift" and clicking on all of them.
Select "Arrange" in the top options bar, then choose "Align or Distribute."
Choose the type of alignment you'd like.
How to align objects to the slide:
Select all objects by holding down "Shift" and clicking on all of them.
Select "Arrange" in the top options bar, then choose "Align or Distribute."
Select "Align to Slide."
Select "Arrange" in the top options bar again, then choose "Align or Distribute."
Choose the type of alignment you'd like.
PowerPoint Design
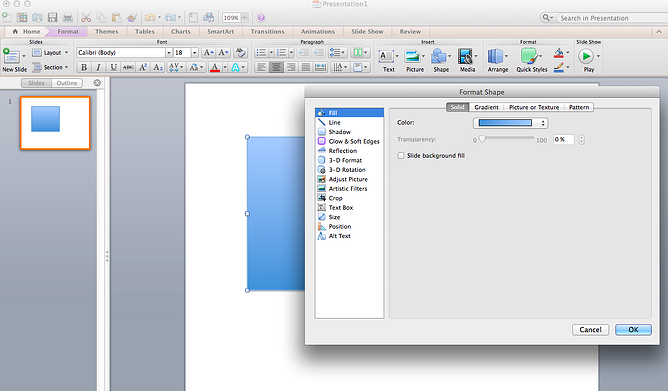
5. Use "Format Menus" to better control your objects' designs.
Format menus allow you to do fine adjustments that otherwise seem impossible. To do this, right click on an object and select the "Format" option. Here, you can fine-tune shadows, adjust shape measurements, create reflections, and much more. The menu that will pop up looks like this:
Although the main options can be found on PowerPoint’s format toolbars, look for complete control in the format window menu. Other examples of options available include:
Adjusting text inside a shape.
Creating a natural perspective shadow behind an object.
Recoloring photos manually and with automatic options.
6. Take advantage of PowerPoint's shapes.
Many users don’t realize how flexible PowerPoint’s shape tools have become. In combination with the expanded format options released by Microsoft in 2010, the potential for good design with shapes is readily available. PowerPoint provides the user with a bunch of great shape options beyond the traditional rectangle, oval, and rounded rectangle patterns, unlike even professional design programs like Adobe Creative Suite or Quark.
Today’s shapes include a highly functional Smart Shapes function, which enables you to create diagrams and flow charts in no time. These tools are especially valuable when you consider that PowerPoint is a visual medium. Paragraphing and bullet lists are boring -- you can use shapes to help express your message more clearly.
7. Create custom shapes.
When you create a shape, right click and press "Edit Points." By editing points, you can create custom shapes that fit your specific need. For instance, you can reshape arrows to fit the dimensions you like.
Another option is to combine two shapes together. When selecting two shapes, right-click and go to the "Grouping" sub-menu to see a variety of options.
Combine creates a custom shape that has overlapping portions of the two previous shapes cut out.
Union makes one completely merged shape.
Intersect builds a shape of only the overlapping sections of the two previous shapes.
Subtract cuts out the overlapping portion of one shape from the other.
By using these tools rather than trying to edit points precisely, you can create accurately measured custom shapes.
8. Crop images into custom shapes.
Besides creating custom shapes in your presentation, you can also use PowerPoint to crop existing images into new shapes. Here's how you do that:
Click on the image and select "Format" in the options bar.
Choose "Crop," then "Mask to Shape," and then choose your desired shape. Ta-da! Custom-shaped photos.
Learn more about creating images for your marketing channels in the video below.
9. Present websites within PowerPoint.
Tradition says that if you want to show a website in a PowerPoint, you should just create link to the page and prompt a browser to open. For PC users, there’s a better option.
Third party software that integrates fully into PowerPoint’s developer tab can be used to embed a website directly into your PowerPoint using a normal HTML iframe. One of the best tools is LiveWeb, a third-party software developed independently.
By using LiveWeb, you don’t have to interrupt your PowerPoint, and your presentation will remain fluid and natural. Whether you embed a whole webpage or just a YouTube video, this can be a high-quality third party improvement.
Unfortunately, Mac users don’t have a similar option. Agood second choice is to take screen shots of the website, link in through a browser, or embed media (such as a YouTube video) by downloading it directly to your computer.
PowerPoint Process
10. Embed your font files.
One constant problem presenters have with PowerPoint is that fonts seem to change when presenters move from one computer to another. In reality, the fonts are not changing -- the presentation computer just doesn’t have the same font files installed. If you’re using a PC and presenting on a PC, then there is a smooth work around for this issue. (When you involve Mac systems, the solution is a bit rougher. See Tip #11.)
Here’s the trick: When you save your PowerPoint file (only on a PC), you should click Save Options in the "Save As …" dialog window. Then, select the "Embed TrueType fonts" check box and press "OK." Now, your presentation will keep the font file and your fonts will not change when you move computers (unless you give your presentation on a Mac).
11. Save your slides as JPEGs.
In PowerPoint for Mac 2011, there is no option to embed fonts within the presentation. So unless you use ubiquitous typefaces like Arial or Tahoma, your PPT is likely going to encounter font changeson different computers.
The most certain way of avoiding this is by saving your final presentation as JPEGs, and then inserting these JPEGs onto your slides. On a Mac, users can easily drag and drop the JPEGs into PPT with fast load time. If you do not use actions in your presentation, then this option works especially well.
If you want your presentation to appear "animated," you'll need to do a little tinkering. All you need to do is save JPEGs of each "frame" of the animation. Then, in your final presentation, you'll just display those JPEGs in the order you'd like the animation to appear. While you'll technically have several new slides in place of one original one, your audience won't know the difference.
An important consideration: If your PPT includes a lot of JPEGs, then the file size will increase.
12. Embed multimedia.
PowerPoint allows you to either link to video/audio files externally or to embed the media directly in your presentation. You should embed these files if you can, but if you use a Mac, you cannot actually embed the video (see note below). For PCs, two great reasons for embedding are:
Embedding allows you to play media directly in your presentation. It will look much more professional than switching between windows.
Embedding also means that the file stays within the PowerPoint presentation, so it should play normally without extra work (except on a Mac).
Note: Mac OS users of PowerPoint should be extra careful about using multimedia files.
If you use PowerPoint for Mac, then you will always need to bring the video and/or audio file with you in the same folder as the PowerPoint presentation. It’s best to only insert video or audio files once the presentation and the containing folder have been saved on a portable drive in their permanent folder. Also, if the presentation will be played on a Windows computer, then Mac users need to make sure their multimedia files are in WMV format. This tip gets a bit complicated, so if you want to use PowerPoint effectively, consider using the same operating system for designing andpresenting, no matter what.
13. Bring your own hardware.
Between operating systems, PowerPoint is still a bit jumpy. Even between differing PPT versions, things can change. One way to fix these problems is to make sure that you have the right hardware -- so just bring along your own laptop when you're presenting.
14. Use "Presenter View."
In most presentation situations, there will be both a presenter’s screen and the main projected display for your presentation. PowerPoint has a great tool called Presenter View, which can be found in the "Slide Show" tab of PowerPoint 2010 (or 2011 for Mac). Included in the Presenter View is an area for notes, a timer/clock, and a presentation display.
For many presenters, this tool can help unify their spoken presentation and their visual aid. You never want to make the PowerPoint seem like a stack of notes that you use a crutch. Use the Presenter View option to help create a more natural presentation.
Pro Tip: At the start of the presentation, you should also hit CTRL + H to make the cursor disappear. Hitting the "A" key will bring it back if you need it!
With style, design, and presentation processes under your belt, you can do a lot more with PowerPoint than just presentations for your clients. PowerPoint and similar slide applications are flexible tools that should not be forgotten.


.png?width=600&name=Free%20Download_%20Facebook%20Live%20Guide%20for%20Business%20(1).png)